

Are you new to Squarespace? Here’s Everything You Need To Know About Building Your Website in 2023

Hey-yo!
You’re new to Squarespace and want to know how the heck to actually get started. The first step to getting started in Squarespace is choosing a template (I’d recommend building your new website on 7.1 to benefit from features like easily customizing your template with Squarespace’s drag-and-drop editor, and choosing a template specifically designed for your industry.
If you haven’t yet chosen your template, I highly recommend right-clicking to open a new tab and reading through ‘Choosing A Template In Squarespace 7.1 For Your Small Business Website: 2023 APPROVED” It’s a good read — although I am a little biased.
By the end of this post you’re going to be confidently working towards making your website a reality and *FINALLY* proudly sending your clients to your website + offer. And as a small business owner that’s pretty darn important.
Your website is the digital storefront for your business, and you want to make a great first impression.
The ultimate goal when a potential new client lands on your website is to usher them through the steps to working with you (because you’re awesome!) without many-minute loading speeds and pages that lead to the internet equivalent of no-where-land.
We instead, want a new potential client to land on your website, be incredibly impressed with what you offer and ultimately hit that contact button — because you work hard and you’re small business should be celebrated 🎉🎉
After you’ve chosen your template, these are your next steps
Steps for adding logo and brand colours
This is what I’m here for, walking you through the next steps toward your completed, strategic, and swoon-worthy website. You won’t be able to keep up with Squarespace Analytic Traffic Alerts because you’ll be too busy making sales.
Let’s start by adding your business logo and brand colors.
If you’re new to your business, start by reading “Choosing Brand Colors For Your Small Business: Create your Logo and Brand Board (in Canva) In Less Than 1 Hour & For Free”.
You don’t have to drop hundreds or even thousands of dollars on your branding when you’re starting out in business. This post is what I recommend for getting started on your own branding. Go ahead and read the post and then come back here to add your newly created logo and brand colors.
We’re starting off this next section with the second checkbox of the Squarespace website checklist. You’ll see this checklist pop up once you select your template.

The first step is to click “edit” in the top left corner. You’ll now see blue rectangles highlighting the different blocks and sections of your template.

Hover over the header, and then select “EDIT SITE HEADER” when the button appears.
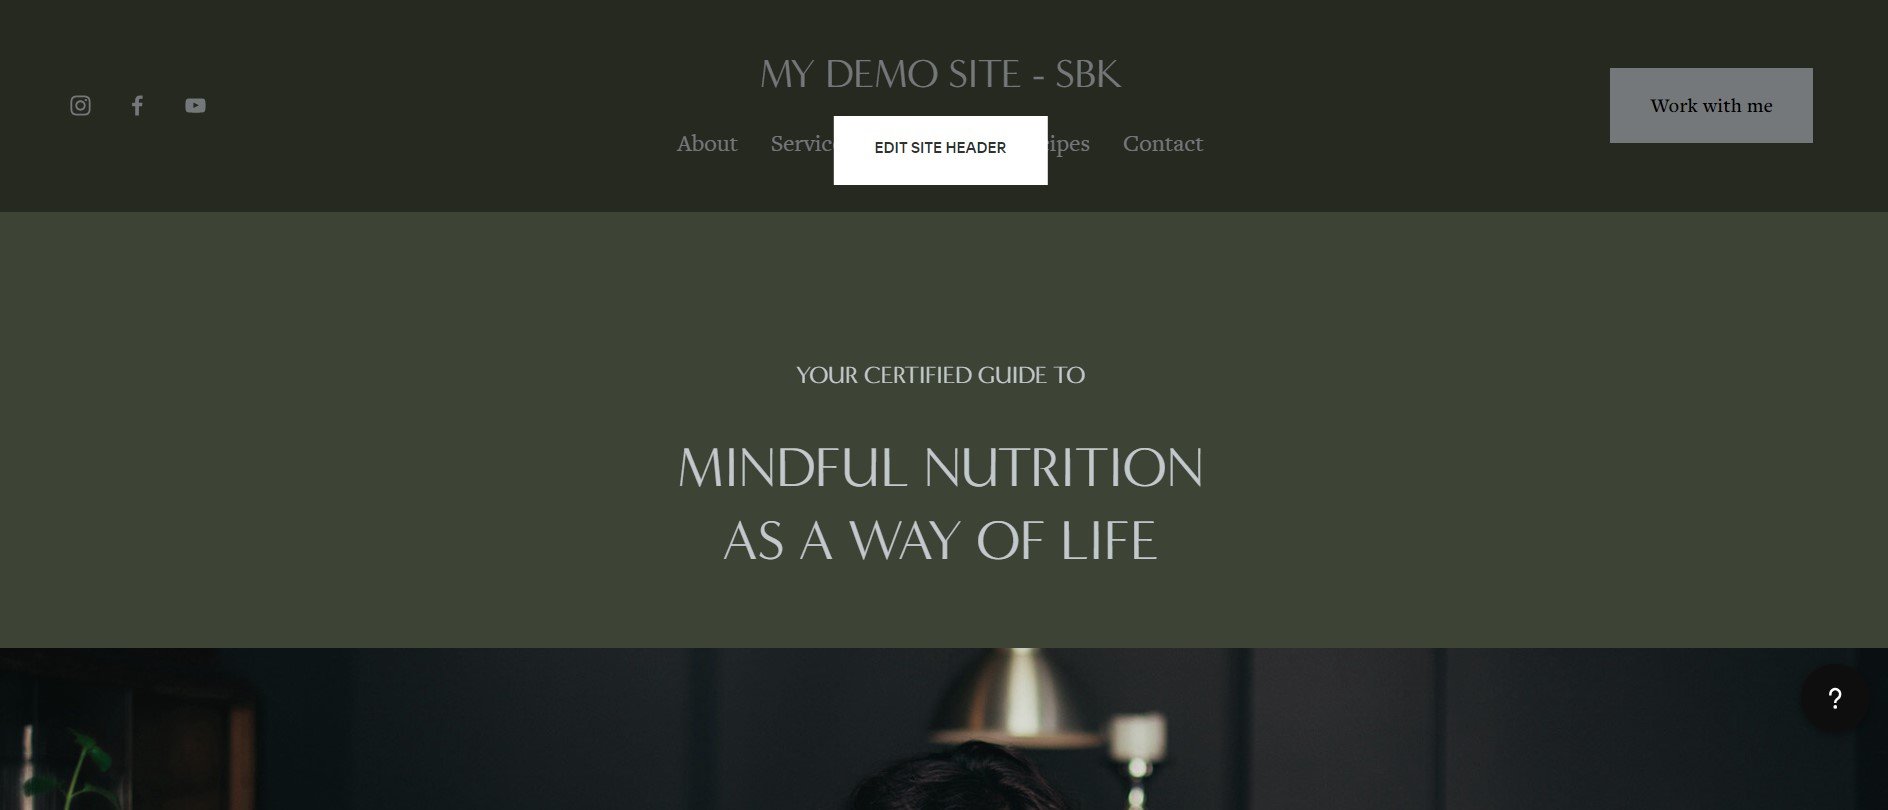
You’re going to see a rectangular box on the lower right side of your screen that says “Global” with three icons to the right.

The globe is for sitewide settings.
The monitor is for desktop settings.
and, the mobile device is for your website’s mobile settings, including iPhones/androids and iPads/tablets.
Next, head to “Site title & logo” and upload your logo.
You have the option to upload two separate logos — one for the desktop version of your website, and one for the mobile version of your website.
If you want a different logo to appear on mobile browsers, upload it here. What I would recommend uploading here is a smaller version of your logo, otherwise, use the same logo for both desktop and mobile.
IMPORTANT: Still name your website even if using your logo because search engines like Google use the title to categorize your website and ultimately recommend your website in search results.

Steps for adding your brand colours
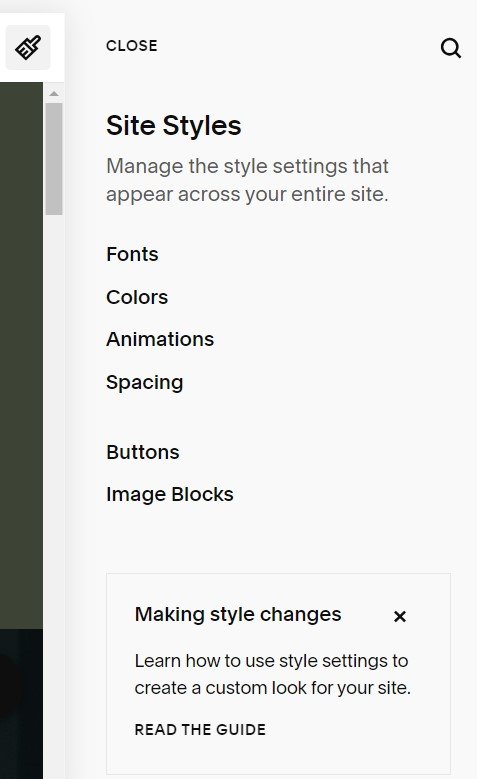
Head on over to the little paintbrush in the top right corner of your screen — this is where you’ll edit your site styles.

Once the Site Styles are open, click on “Colors”,
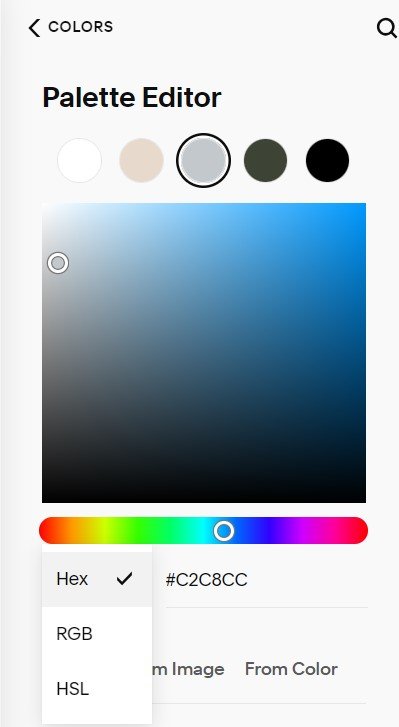
Then “Edit palette”,
Click Hex from the drop-down menu under the color slider.
Enter your brand colors here — I recommend keeping the white and black or colors similar in your branding and then adding three complimentary colours. Add your colors from lightest to darkest.
Steps For Choosing Your Font In Squarespace
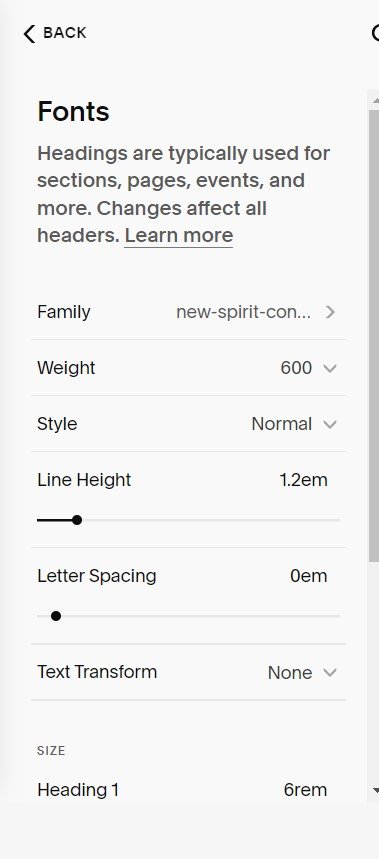
Go back to the Site Styles main menu and this time head on over to “Fonts”.
Click “SWITCH” (in blue) beside the text FONT PACK.

If you haven’t already chosen your brand font(s), you can browse through the different recommended font combinations.

A quick background into the different types of typefaces — San-serif has no lines at the ends of the letters, whereas serif has line details at the end of the letters.


Go through the menu to select the font pack that you like best.
TIP: Leave the base size at 16px or large
To further customize, under “Global Text Styles” click on paragraph to change the space and weight of all paragraph text.
Repeat for Headings.
Add a font combination not in Squarespace
Click on “Headings” under Global Text Styles
Click on “Family” > “Browse all fonts”
Search through the fonts listed or search your desired font into the search bar.

Once you find your font, click it and hit the arrow back to the font family menu. You’ll see your new font listed above.

Edit Site Themes
To start, edit just two site themes — for a sense of simplicity let’s edit light 1 and a dark 1 and alternate them throughout your website.
To find out what site theme a section is using, when editing your website, look at the top right corner of the section. It will say “Dark 1”, “Light 1” etc…

When in the site styles menu, you can see the changes as you make them (as long as the feature is in the section that you’re editing).
A shortcut is to click on a block while editing a theme, for example, a header.
Under “Edit Theme”, the header will show (instead of the big long list of options to edit) and you can easily change the color of the header within that theme.


Take the next step and plan your small business website!
How to Add Photos and Text To Your Pages
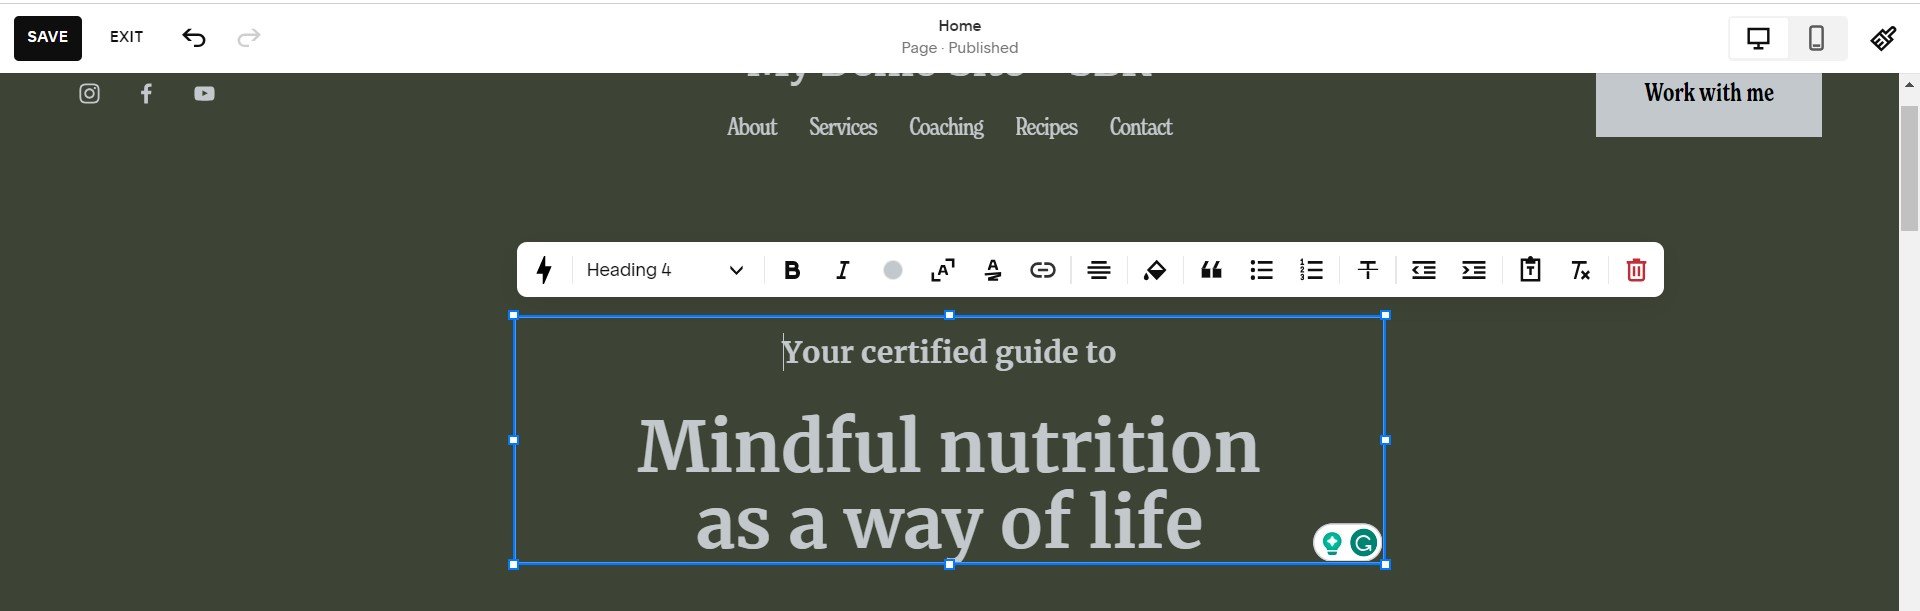
Edit/change a photo
Click on the image
Select the pencil icon (this is the edit button), then “REPLACE” and “UPLOAD FILE” followed by the add button to upload your photo.
Change a background
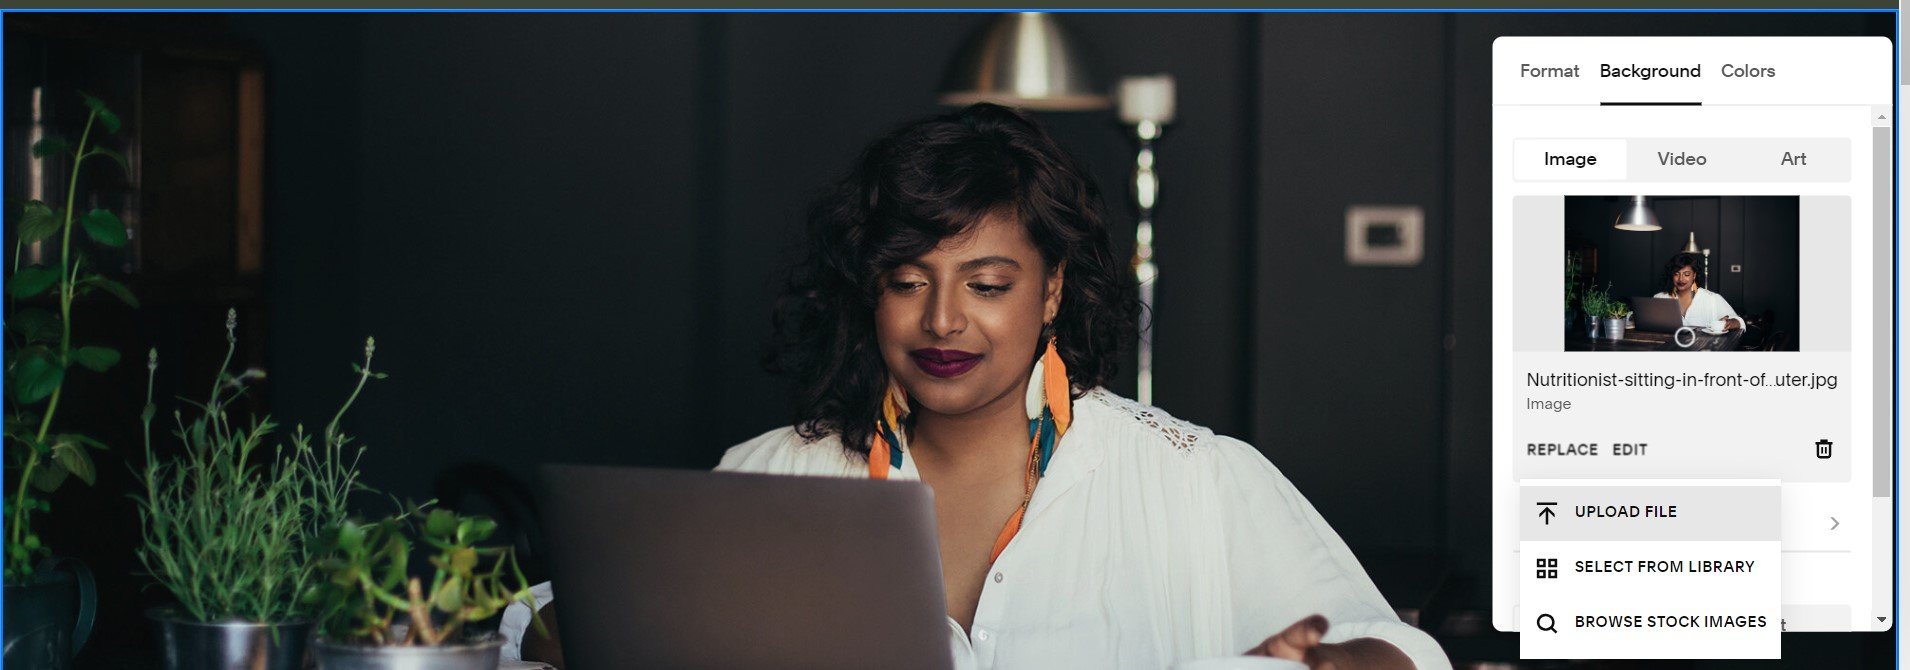
Click on the background you’d like to change and then “Edit section”, select “Background”
Under the image, hit the words “Replace” > “UPLOAD FILE”
Add your photo,
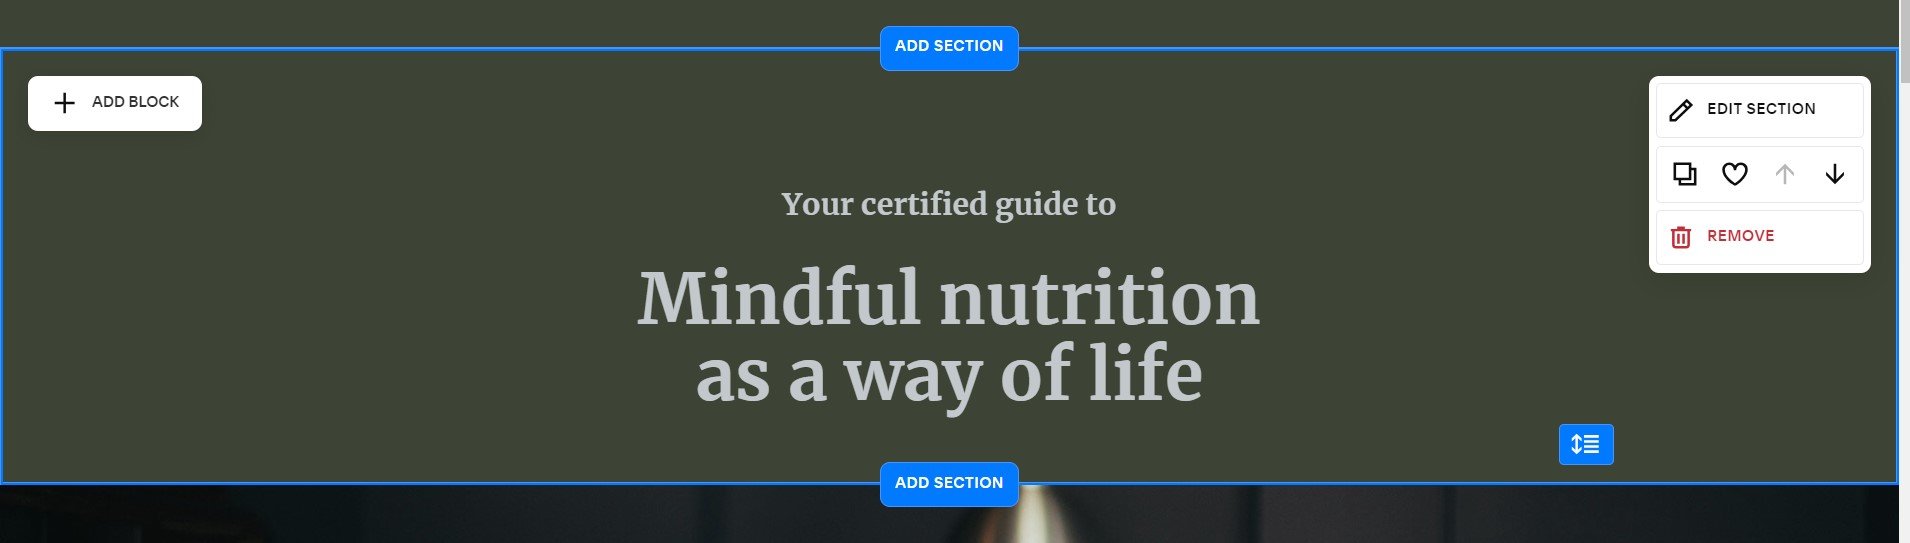
Adjust the size by dragging the corner of the text box outward until it reaches your desired size and shape.
To move the image block, by clicking in the text box and dragging it to your desired location on the page
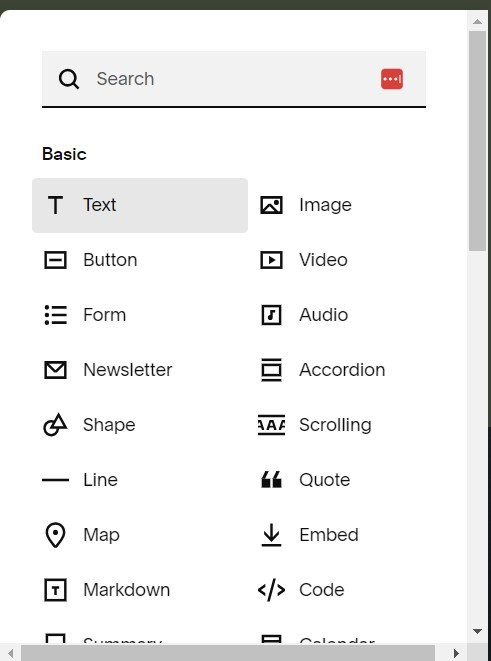
Add a photo
Hover in a section until you see the “Add Block” button on the top left corner of the section.
Under “BASIC”, click “Image”.
Click the plus sign in the center of the image block,
And “UPLOAD FILE” and add.
Edit a text box
Exit out of the site styles editor and click into a text box within a section, to make things easy, click on a text box in the first section.
Add your own text to the text block.
You’ll see a floating bar with similar editing options as you do with a Google Doc or Word document.
Add a text box
Hover in a section until you see the “Add Block” button on the top left corner of the section.
Under “BASIC”, click “Text”.
Add and edit your text.
Adjust the size of the text block by dragging the corner of the text box outward until it reaches your desired size and shape.
To move the text box, by clicking on the text block and dragging it to your desired location on the page
Customize Your Homepage
Before creating your website, I highly, highly recommend planning out your website goals so that you can create a strategic website that walks your clients through the logical steps to take to go from first clicking on your website to signing up for your email list or working with you.
This step is critical when I work with clients. It is so important to have a game plan for your website because a) your website will be completed faster b) you know exactly where to spend your time and energy to collect all the integral information for your website.
Grab your copy of my Ulitmate Website Planning Guide & Checklist for Small Business Owners.
By planning ahead you’ll create an impactfully different user experience.
^^ Make sure to download your copy and carve out some time to work through it.
Something that I’m passionate about is creating strategic + beautifully designed websites. It’s great to have a website that is B-E-A-U-T-I-F-U-L, but here’s the thing, if it’s not designed with strategy in mind, you’re not going to see the results you’re hoping to see.
A recent Forbes study found that 48% of people decide on the credibility of a business through its website, and 40% will leave if the loading time takes longer than 3 seconds.
To beat these statistics you need to 1) create a well-designed website and 2) build your website with the user experience in mind right from the beginning — this begins in the planning stage!
For a small business, I’d recommended having the following pages — Home, About, Contact, Services and Portfolio.
We want to create a narrative for your client to follow along with and make it super simple to follow along.
Too many headings, and it’s confusing where to go next. Not enough headings, and we’re in the same spot — confusing where to go next.
‘Cause here’s the thing, you might have all the important information on your website for your visitors, BUT and this is a big BUT (hee hee), if they don’t know where to go to find it, it’s going to be a frustrating experience for your visitor.
Frustration = visitors leaving your site
And, we don’t want that.
Whenever you get stuck refer back to your inspiration board and photos that you saved on your Google Drive or go and find new inspiration. Not sure where or how to find inspiration for your website without copying another website (that’s a big no-no, and I for sure don’t want you to do that — because we have a plan!
Go and download your copy of The Complete website planning guide and checklist now and check out the section on finding inspiration for your website (it’s on page 4), see I gotcha!
Tips For Making Your Squarespace Template Look Like A Custom Website
Create graphics and backgrounds in Canva
Optimize photos & add your own photos
Play with the spacing of elements, change the placement of buttons and photos
Change the font size and weight
Continue building out other pages! You’re almost there!
Coming soon page
Under “Utilities”, click “System Pages”
Select “Lock Screen”.
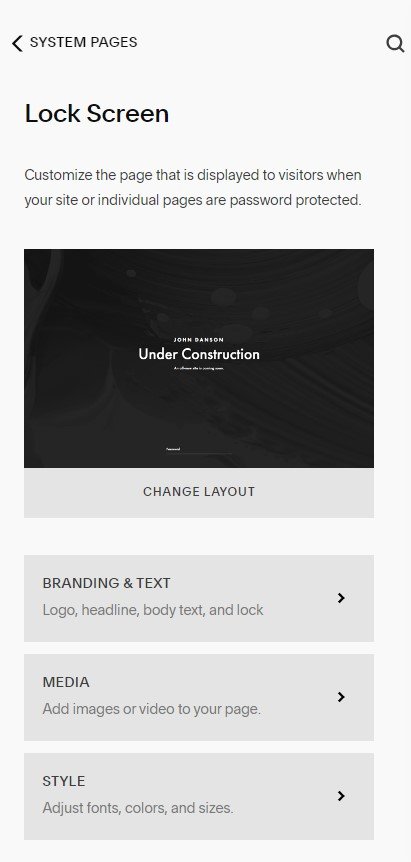
Layout
Change the layout of the page by selecting “CHANGE LAYOUT”.
Pick your favorite from the options.
Branding & Text
Under “BRANDING & TEXT”,
Add in your logo or add text for your company name.
Add in your headline, it can be something as simple as “Coming Soon!”
Under “Body” add your text about when your site will be live.
Select whether you’d like to have the lock displayed or not.
Adding an Image or Video to your Coming Soon Page
Click on “MEDIA”,
Add in your images and/or videos
“Upload Images” and add.
Repeat to upload a video under the video tab.
Adjust Coming Soon Page Style
Click on “Styles”.
Work your way through the list of features, and edit the ones to match your desired look.
SEO Settings before you make your website live
Go through each of your website pages and give them a page title, making sure to include your keywords.
When adding photos to a page it’s best practice to give your image an SEO title. The best way to do this is to explain what is happening in the image and include keywords. For example, on my own services page, the page title is “Custom Squarespace Websites”.
It’s best to keep your page titles under 150 characters. Moz has a great tool that displays how your page title will be displayed on Google and also provides a character count. I’ll link it here for you to check out.
Important bits of legal docs to have ready before your website is launched is your cookie policy, Privacy Policy and Terms & Conditions.
Making your website live
It’s time — you’ve put in the work to build your very own custom website! A website that you’re proud to send clients to because you’re so darn proud of yourself!
Let’s make it official — it’s time to sign up for your Squarespace Subscription and switch your site to public!
Settings > Site Availability
Upgrade to publish
Then select Public
Let the deep breath out now. You’ve done it! You achieved building your website in Squarespace and it kinda rocks.
When you’re done celebrating — I highly recommend celebrating this big milestone in your professional life. Go out for dinner with family, friends or significant other and celebrate with a glass of wine or splurge on that new outfit you’ve been eyeing up.
Additional Next Steps ….
Design Social Media graphics to promote your website
Write and publish your first blog post
You might also like to read….
Five Quick Tips To Find Inspiration For Your Small Business Website
10 Reasons Why You Should Host Your Small Business Website With Squarespace
Choosing A Template In Squarespace 7.1 For Your Small Business Website: 2023 APPROVED”
7 Unexpected Lessons I Learned From Starting A Small Business As A Stay At Home Mom