

Choosing Brand Colors For Your Small Business: Create your Logo and Brand Board (in Canva) In Less Than 1 hour & For Free

You decided to go into business for yourself (congrats!) and quickly realized there’s a lot that goes into starting a new business — from picking a business name to registering your business to learning all the different software, hello Canva, Squarespace, Trello, ConvertKit and countless more tools that keep your business running seamlessly.
An important next step after all that is creating a cohesive look for your brand.
This includes everything from what fonts you’ll use to the color palette that best represents your company.
When you look at the most recognizable companies in the world, you know them because of their branding. Maybe the first branding examples you think of are the infamous Apple for the sleek and minimalist Apple Products or the Swoop that represents Nike — can you hear the ‘Just do it’ ringing in your ears, or is that just me?
Having a curated brand is an important step for your small business because it’s going to help differentiate your brand from the competition.
Maybe you’re just starting out and don’t have any idea of how to start your business branding or maybe your saving up so you can hire a professional to help you design something that makes your business stand out.
You’ve already spent time (a little more than you’d like to admit trying to create a brand board in Canva but you’re not sure what the next steps are for choosing your brand's fonts and colours. Let’s get you rockin’ and rolling one step closer and gain some clarity on how you want to present your brand.

Steps To Building Your Brand Board Using A Canva Template — Including Creating Your Own Logo
Step 1: If you haven’t used Canva before, set up an account with Canva (the free version works just dandy for this) or sign into your account
We’re going to start by using a template to both save time and I always like having an example to get me started when attempting something new.
Step 2: In the top right click on the button that says “‘Create a Design” and type in Brand Board
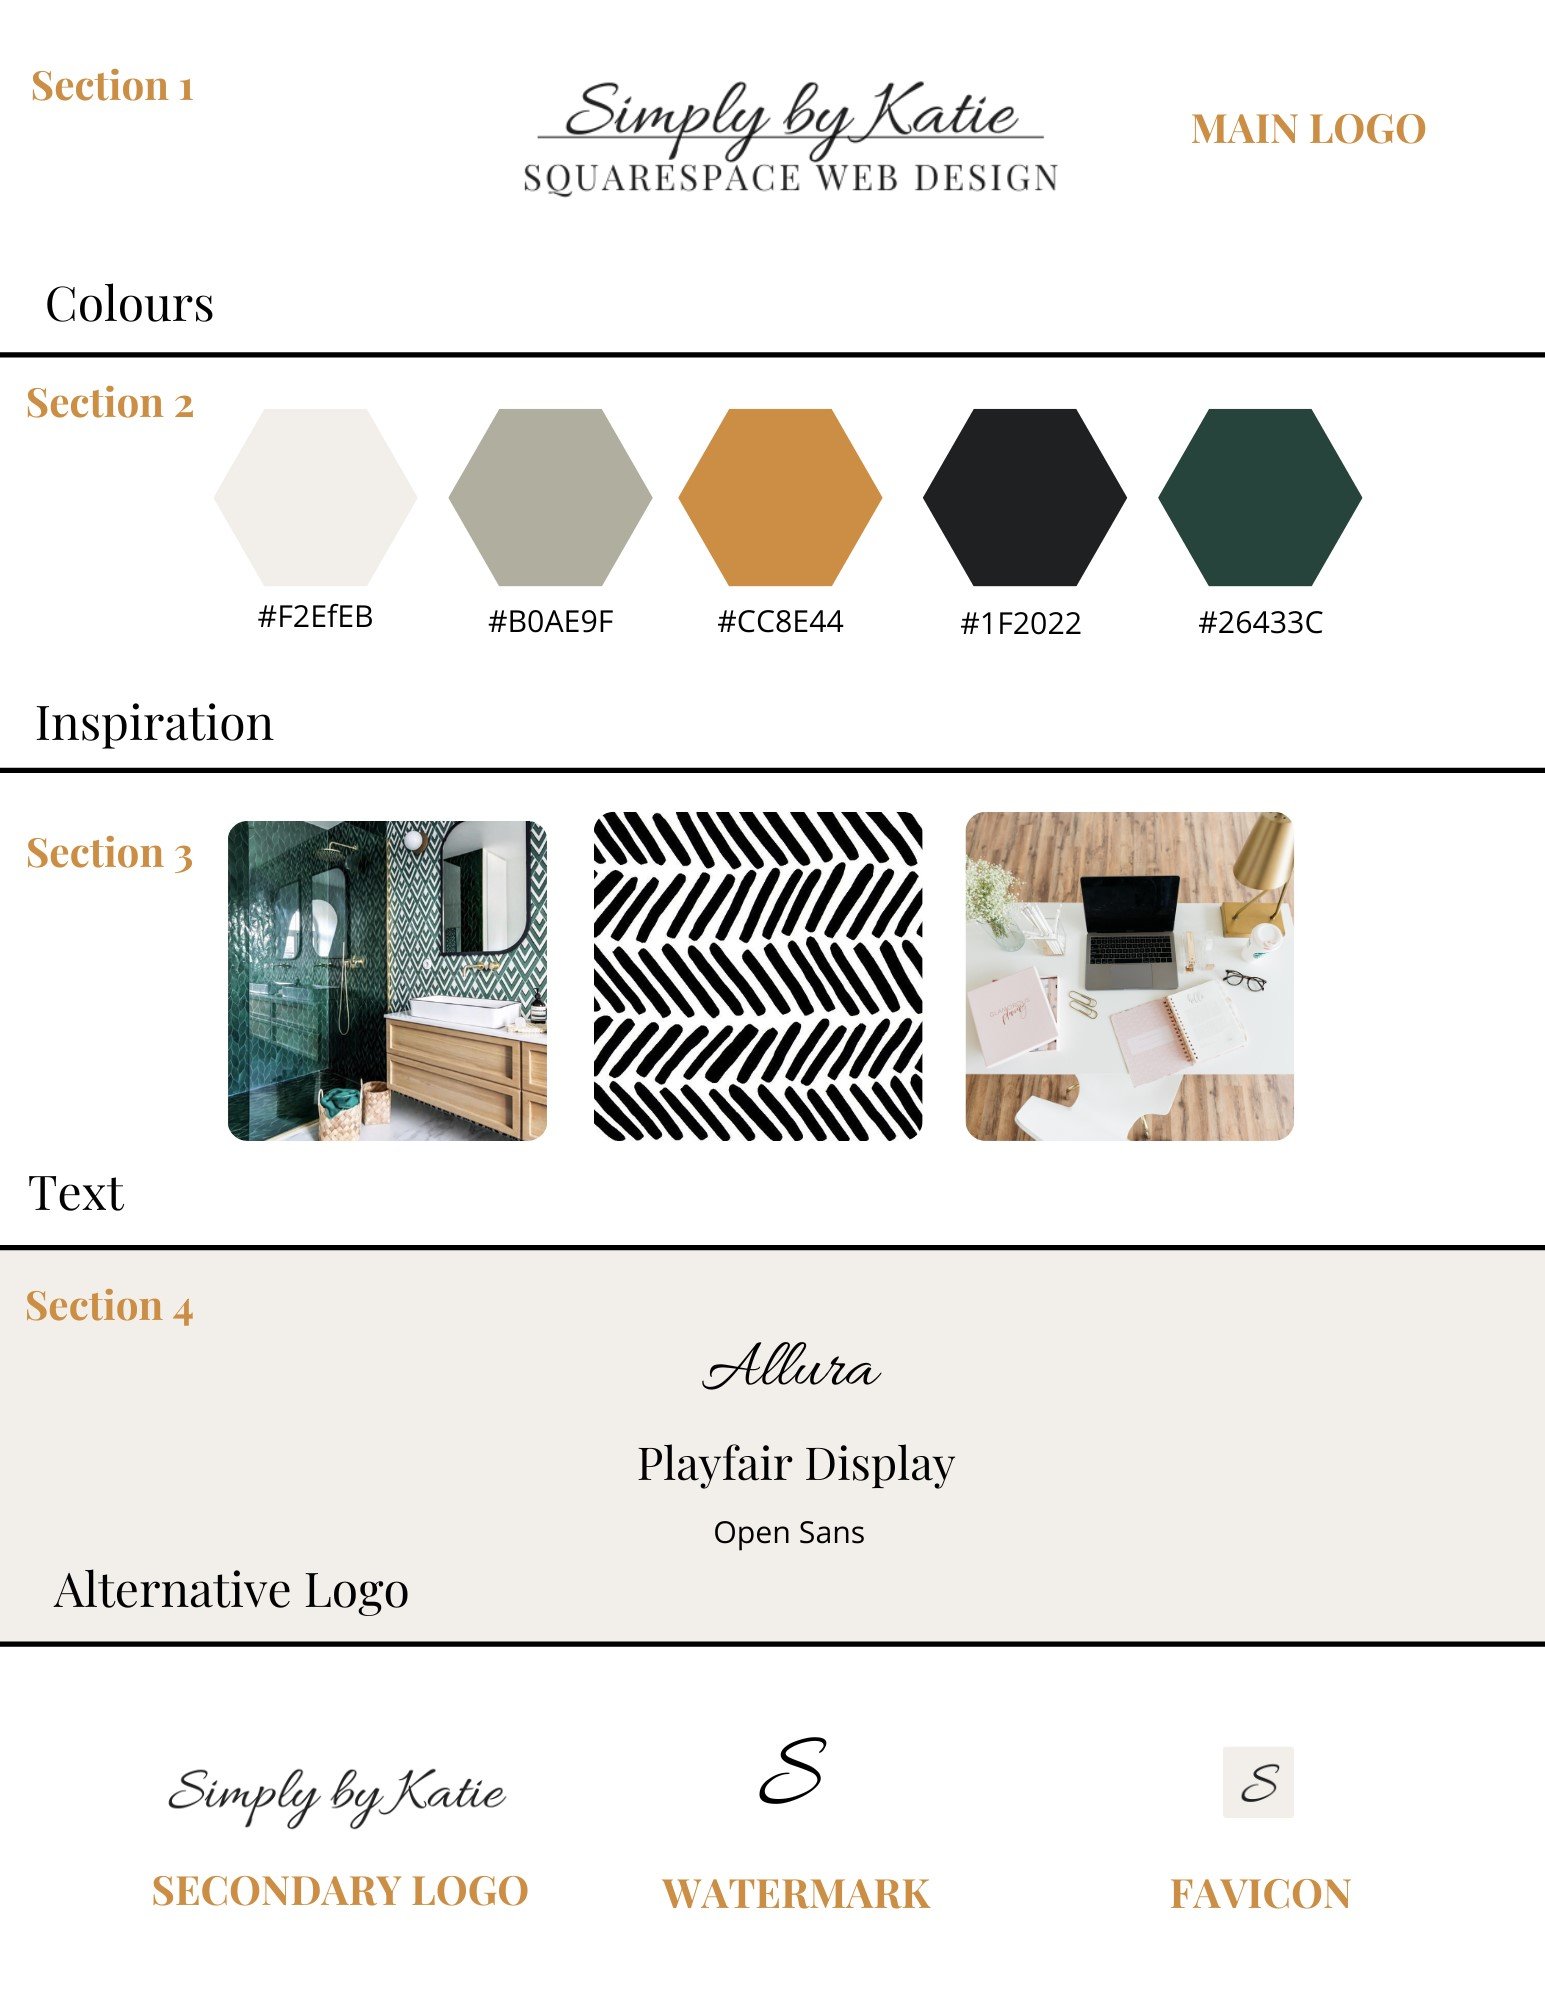
Step 3: Take a browse through the different templates and choose a template that you like the best. What you’ll see is that each template is divided into four different sections…
Section 1 - logo’s: we’re going to be creating 4 different logos to use throughout your branding:
Primary logo: This file will be the logo that you use the most — you can use it on your website, or larger marketing materials. This logo will have the most detail and will need a lot of space to display every detail properly. Most often this this version of your logo will include a tagline.
Secondary logo: This is a shortened version of your main logo that is used when you need a smaller version of your logo to place on smaller marketing materials or invoice. Most often the tagline will be removed and just the company name and/or design feature is left. This logo can either be stacked vertically or horizontally.
Watermark logo: This version of your logo is used on the smallest of areas like on your Social Media Profile, Blog Post graphics or website footer. This version of the logo usually consists of letters (a letter mark) or a single icon and can still include your full company name.
Favicon: This logo is displayed in an open tab on your internet brower and is found next to your website name. It is the smallest logo, usually just an initial or single icon and is a square or circle in shape.
Section 2 - color palette: most templates will have a selection of five brand colors within the color palette
Section 3 - inspiration photos: Pinterest is a great resource for finding inspiration photos for your brand (and website as a matter of fact!)
Section 4 - fonts: It’s best practice to have two-three fonts within your brand. One for headings, the second for the main text and paragraphs and then you can add a fancier font that is used occasionally.
You can go with a sans-serif font, a serif font or a combination.

Example Brand Board

Take the next step and plan your small business website!
Create Your Logo(s)
Step 4: Create a logo by going clicking on the “Start a new design” button and typing ‘logo’ into the search bar
Step 5: Use the templates as a guideline to create your new logos.
You will notice that the file size for logos are always 500 x 500px
I would always recommend using a simpler design without a lot of details. When printing or embroidering your logo, small details don’t always show up crisp as they do on a computer screen.
Fun side story, when I was working as a sales coordinator, I loved being able to see the different logos and branding that came through on a regular basis. I saw firsthand how intricate logos didn’t fair well when going from digital to print form. If there was smaller text as part of the logo, it didn’t show up and usually had to be omitted. On the opposite side of the spectrum, if there were too many colours or intricate designs, it became a very distracting logo.
Now back to creating your logo.
This is your chance to play around with fonts and colours.
If you’re struggling to find a starting point, Pinterest is a great resource for searching for inspiration.
Type in things like…
The best font pairings in Canva (& Squarespace)
Professional brand font
Simplistic logos
You can also take a look at the different free fonts available in Canva and test out different combinations.
PRO-TIP: It’s worth taking the extra step and searching for free fonts that are also available in Squarespace. It’ll save you time in the long run, we want to avoid you falling in love with a font in Canva, only to find out you can’t use it in Squarespace!
Save your logo as a png to ensure your logo is saved in a high-resolution file. It’s best practice to keep your logo file size to under 200 kb.
I find it helpful to increase your logo to the full 500 px so that when adding to your website it doesn’t show up as a tiny little square and reduces the chance of your logo showing up blurry.
Repeat to create your alternative logos and website favicon.
Download all the files and save to your Google Drive.
Upload Logo’s To Brand Board
Step 6: add your logos to your brand board by uploading the saved files into Canva via the “Uploads” tab and then clicking on “Upload files” to add them to your library.
Add logos to your brand board from your uploads library.
Choosing Brand Colors That Are Authentic To Your Brand
Step 7: This is where we pull inspiration from photos that represent the feeling of your brand. Head over to Pinterest and create a new board, feel free to call it something along the lines of Branding Inspiration or whatever your feeling at the moment.
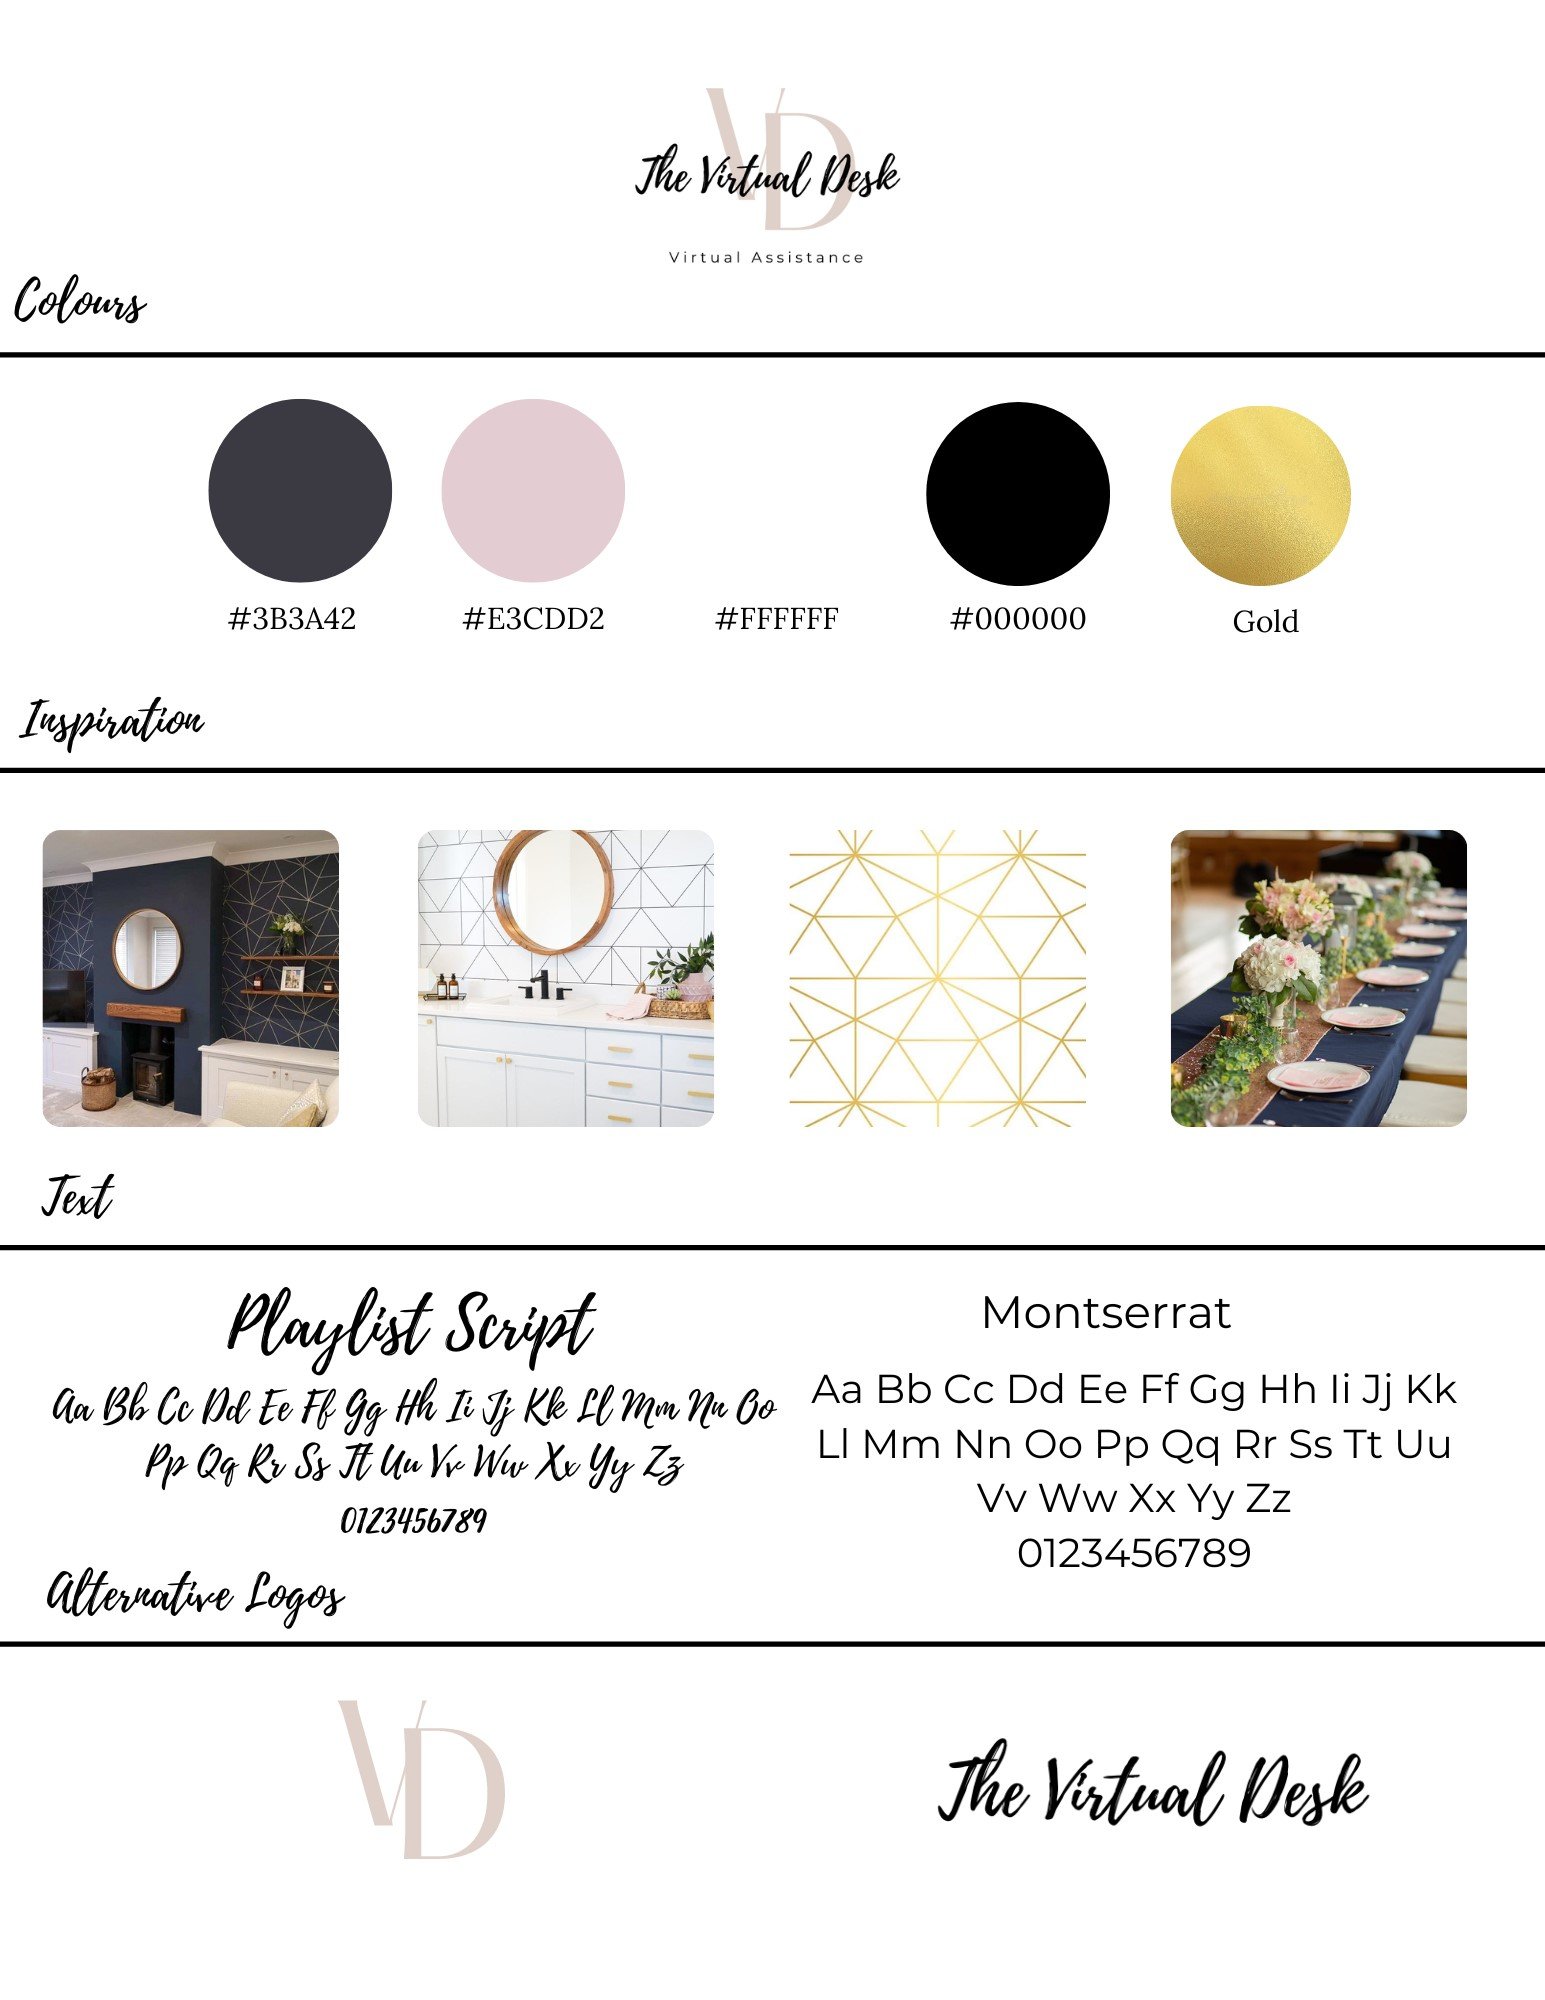
Let me take you behind the scenes, just for a quick sec on a brand board I designed. This small business was run by a solopreneur who offered Virtual Assistance to other solopreneur businesses. The overall look that Rebecca desired was a bold color with beautiful design elements and she knew that she wanted navy and blush to be a part of her brand colors.
Words that I searched for were…
‘Navy & blush’
‘Geometric Pattern’
Take a peek at the Pinterest Board created and then how I turned the inspiration into a complete brand board.
Pinterest board

Brand Board
ACTION STEP: Give yourself a few minutes to jot down words that you’d like to describe your brand and then take some time to pin images that resonates with your brand.
I find that researching color psychology is a helpful tool in identifying what colors you want to include in your business. If you do a quick Google search and type in “color psychology chart branding” you’ll be able to pull up a ton of different color charts with examples of what each color represents and what colors well-known companies use.
Identifying adjectives to describe your brand is extremely helpful also because you’ll be able to type them into Pinterest and find a wealth of examples you can use to find your brand colors.
Light & Airy
Bright & Bold
Simple & Natural
Pulling Color (HEX) Codes From An Image For Free
Step 8: Once you’ve chosen your inspiration photos, add them into a HTML Color Codes, link here and pull the HEX codes from the image.
All you have to do is upload the photo and then drag the cursor over the color you want to know the code for.
Write down all your codes in a place where you can easily come back to reference. I like to keep all my HEX codes saved in a Trello Board. A cool feature when you add your color codes into Trello and save the card, Trello will display a preview of each color beside the code.

Add Color’s & HEX Codes To Your Brand Board
Step 9: Add your 5 colours to your brand boards color palette
I’d recommend keeping a white and black or doing a light and dark colour that is for simplicity sake and then doing 3 accent colors.
Save your brand new board!
You might also like to read….
Five Quick Tips To Find Inspiration For Your Small Business Website
10 Reasons Why You Should Host Your Small Business Website With Squarespace
Choosing A Template In Squarespace 7.1 For Your Small Business Website: 2023 APPROVED
7 Unexpected Lessons I Learned From Starting A Small Business As A Stay At Home Mom
Activities To Do With Kids During The Summer So You Can Still Run Your Business (Work From Home)